


What to do if the tension system of a dog grooming scissor falls out?
If the tension of the grooming scissor is too loose and is not immediately adjusted, the tension system can fall out in part or entirely. If all or some of the tension system components fall out, a dog groomer must ensure that they have collected each piece and placed them back in the correct order if they can do so. If the parts are not set back correctly, the tension and the blades of the scissor can be damaged.
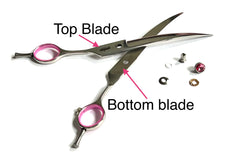
A Scissor with the Raised Adjuster/ Screw.

A grooming scissor with this system generally consists of five components: the barrel, a white washer, a silver washer, a copper washer, and the adjuster/ screw. The screw of this system rests on top of the blade and is easily accessible to adjust manually when necessary. Whilst this system is very popular, having the screw raised can cause potential issues such as ‘snagging the coat’ or losing the tension if knocked by a dog or it falls off the grooming table.
How to position the components correctly if they have fallen out?
Step 1. Place the white washer over the barrel and ensure that it is securely in place at the barrel’s base.
Step 2. Align the two blades on top of one another with the barrel holes in both blades lined up together.
To recognise the bottom blade, look for the blade with the bumper on the finger hole. The top blade will have the logo facing upwards.
Step 3. Feed the barrel fully through both blades and once in place, the tip of the barrel will protrude above the top blade.
Step 4. Place the silver washer onto the tip of the barrel. This washer is shaped like a bowl, and it must be facing downwards when in position.
Step 5. Place the copper washer on top of the silver washer. Ensure that the tiny notch on this washer is facing upwards.
Step 6. Ensuring that both the silver and copper washers are aligned with one another, gently screw the tension adjuster into the barrel itself. Do not force it into place. This will cause damage to the threads inside of the barrel and on the tension adjuster.
Step 7. Once the tension adjuster is inside the barrel, the notch of the copper washer will have fitted into the grooves carved into the underneath of the adjuster.
Step 8. Using your fingers, carefully turn the adjuster clockwise to set the correct tension. As the adjuster is being gently turned, clicking will be either heard and/or felt. This is a good indication that the tension system is now working correctly.
A Scissor with a Flat Adjuster.
Like a grooming scissor with a raised tension system, this system consists of a barrel, a white washer, a copper washer, and a flat tension screw. The differences, however, are the length of the barrel and the tension adjuster/screw itself. The screw sits within the top blade and enables the tension system to remain at the correct tension for a longer period.

Step 1. The white washer is placed over the barrel and sits securely at the barrel’s base.
Step 2. Align the two blades on top of one another with the barrel holes in both blades lined up together.
Step 3. Feed the barrel fully through both blades and once in place, the tip of the barrel will sit inside the hole of the top blade.
Step 4. Place the copper washer onto the tip of the barrel with the notch facing upwards.
Step 5. Place the tension adjuster onto the copper washer and barrel.
Step 6. Once in place and using a tension key, wound the adjuster clockwise to set the correct tension. Like the raised adjuster, you will hear and/or feel the clicking of the notch against the grooves indicating that the tension system is working correctly.
In summary, when positioned correctly, both systems will help maintain the grooming scissor’s correct tension and with the tension adjuster, a dog groomer can adjust the scissor's tension as and when it is needed.